Showing posts with label kid favorites. Show all posts

Tuesday, June 1, 2010

Hold the Mayo

Just before we lost egg, I'd made some amazing homemade mayo with balsamic vinegar...I took one taste & swore I'd never get store-bought again! I suppose that was a prophetic statement, in a way, since it has been tough impossible to find a top 8-free mayonnaise. Not exactly what I meant.

I'm not a big mayo eater (though I seriously might have become one for the homemade stuff) so I haven't missed it that much. But my toddler does love a sandwich (mostly for the bread, I think) and since GF breads tend to be dry/crumbly, it seems like mayo might be useful there.

Anyway. Here are two recipes (I must confess that I have not made either one...am just posting here because I'm posting it to my favorite allergy group and figured I might as well plop it on here as well) that might fit the bill for your family. I'd love to hear feedback!

Beannaise

1 3/4 cup drained cooked or canned white beans (one 15 or 16 oz can)
2 Tbs fresh lemon juice
1 Tbs white wine vinegar or additional fresh lemon juice
1/2 tsp salt
1/4 tsp dry mustard
1/3 cup EVOO
1/3 cup organic canola or safflower oil

Put all of the ingredients except for the oils into a blender or food processor with s-blade. (Blender will yield a smoother result.) Blend or process until creamy. With appliance running, slowly & steadily add the oils. Stop machine and scrape down sides as needed; process to desired smoothness. Refrigerate to chill & blend flavors.

Cover tightly and store in refrigerator. Will keep about a week. Can also be frozen.

Avocado Mayonnaise
Yield: ¾ cup (177 ml)
This blend can be used as a sandwich spread, salad dressing or to boost flavor of potato or bean salads.

1 medium or large avocado
juice of 1/2 lemon
1/4 tsp salt or to taste
pinch of cayenne pepper
1/4 cup (59 ml) expeller pressed vegetable oil

Remove pit from avocado; scoop out flesh. Place in blender along with lemon juice, salt and cayenne pepper. Blend until smooth. With appliance running, slowly & steadily add vegetable oil. Stop machine and scrape down sides as needed; process until creamy & smooth.

Cover tightly and store in refrigerator. Will keep (without discoloration) 5-6 days.

Wednesday, April 21, 2010

What's for Dinner? PIZZA!


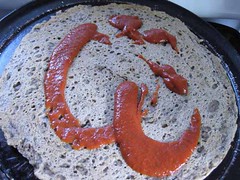
Seems like my allergy mom friends are unhappy about pizza lately, while I am loving it over here. When my non-allergy peeps ask me, 'How do you make pizza without cheese?' My flip answer is, 'You just leave off the cheese.' Well, it sounds flip, but it's really kind of true. You just need to pay a bit closer attention to the other ingredients & you're set.

Here's the crust I usually use. I'm not going to say it's the best pizza crust ever (though I'm loving it more each time I have it), but if I spread the batter out really thin, I get 3 pizzas out of the recipe and they're thin enough that the texture is quite good. (The cooking temp was left off the PDF I linked to up there... it's 350F.) Eventually, I'll get around to trying a yeast-based recipe or two but for now this works for us. (And yes, I sub flours all the time...and it always seems to work okay.)

First off, I make sure I use a good sauce. I am not a huge fan of tomato sauce in general but I like (Surprise! What can I say? There's a reason I rep their food, people!) the Wildtree one (Hearty Spaghetti Sauce Blend, but I'm going to try the Scampi blend sometime soon, too, for a tomato-free version)...partly because you can easily customize it to your own tastes. If you get that one, ignore the cooking instructions on the package. Bring to a boil, reduce heat and simmer for about 10 minutes. Then you can cook it as short or long as you want (I usually do at least an additional 10 minutes). The boil/simmer helps the tomatoes to carmelize, which gives the sauce a MUCH better depth of flavor. You'll just need to watch the moisture level, as the simmering can thicken it up pretty quickly. Oh, and I usually use canned tomato sauce rather than stewed tomatoes because I like the texture better. Use whatever works for you.


Now, what about toppings? I'm sure you have some favorites & those will probably be fine here as well, unless you're a one-topping type and then I'm thinking you might want to branch out a bit. ;)

A few of my favorite combos:
-- ground beef, spinach, tomato, garlic (or leave off the beef and add basil for a fabulous veggie version)
-- turkey sausage, ham, sauteed spinach & onion, pineapple, olives or olive tapenade
-- turkey sausage, sun-dried tomato, olives, spinach


Since there's no cheese, I usually drizzle on some grapeseed oil (flavored oils work great for this) or extra virgin olive oil--after baking, so it doesn't all soak in--both for flavor and mouth feel. You could also add a bit of balsamic vinegar on top, if that strikes your fancy. I also once used Karina's Best Cheesy Uncheese Sauce and, while it didn't fool me into thinking there was cheese on my pizza, it wasn't bad. (My subs to the Uncheese Sauce: other wheat-free flour, oat milk. I added the mustard but then decided I'll leave it out next time...flavor was too overpowering. And we are seed-free, so no tahini. And it was still pretty good.)

My kids LOVE pizza. Even the cheese eaters in the household like these versions a lot and my picky eater has even started requesting his pizza without cheese. Now that's an endorsement. :)

**I've recently discovered that Daiya fake cheese is safe for my little guy so we have added that to our pizzas now. I do like it better than w/o any cheese at all but pizza seriously was a fave even before that. (We've only had it once so far with the Daiya, if that means anything to you.)

Monday, April 19, 2010

Microwave Potato Chips? Really?

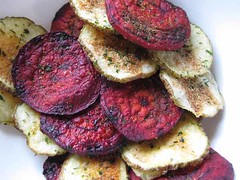
I loooove sweet potato chips. I'd eat them all the time except they're kind of a pain to make. Or so I thought. And those fancy veggie chips are so spendy, plus there's the whole issue about unsafe ingredients. But that doesn't bother me anymore, 'cause I just learned that I can make delicious veggie chips in my microwave! :)

I feel silly even posting a recipe because this is so incredibly easy. (I feel even more silly that I didn't know about this before!)


Microwave Veggie Chips
vegetable of choice
1-2 tsp oil of choice (I've tried grapeseed* & olive, both worked great)
salt or other seasoning, to taste

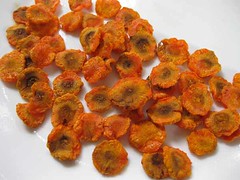
Slice veggie into thin slices. (In my experience, disc-shaped veggies cook the most evenly. However, carrots are so tiny in discs that I'm going to try them sliced lengthwise.) You can use a mandolin slicer or slice them by hand. Leave skin on or peel it off... your choice. (I'd definitely peel non-organic root vegetables.)

Put veg slices into bowl and toss with oil. (*Garlic & jalapeno grapeseed oils were very yummy. I use the Wildtree oils, so I'll definitely be trying all of those--plus spice blends since I have a cabinet full of them--favorites so far are Scampi and Cajun.)

Add salt or other spices, as desired.


Arrange veggies in a single layer on a parchment paper-lined microwave-safe dish or an oiled dish. Cook on high until veggies start to brown, turning them over around halfway through cooking time; time will depend on thickness of slices. Allow to cool/crisp. Serve. (Not sure how they'd store, as I've not made enough at once that storing was an issue. In other words, I eat them pretty much as fast as I can cook them; they go even faster if I share.)

I made super-thin slices using just a potato peeler...those took about 5 minutes to cook. When I did hand-cut slices that were about as thin as I could make them that way (I'm no chef) it took about 11 minutes, and they were just a tad overcooked. My mandolin slicer cuts them a tad thicker than that. You'll need to play with the timing. Once they start to brown they seem to brown pretty quickly so you'll want to watch closely.


My preschooler flat-out refused to try these for a while (his pickiness is becoming the stuff of legend around our house) but as soon as I bribed convinced him to try them, he was asking for more. :)

Okay, now go get your chip on!

Tuesday, March 16, 2010

What's for Dinner? Turkey Tenders

Last time I tried to make nuggets I used a 'just like McDonald's' nugget recipe. Well, I'm not a fan of those but my kids usually like that junk so I figured it was worth a shot. No go. I don't know if it was my choice of flour sub (buckwheat & something, IIRC) or what but DS1 would barely touch those things.

Because I'm a glutton for punishment, I thought I'd try again and just be careful about the flour. I looked at a few recipes and then (largely because I didn't want to take the time to go fire up the other computer so I could print out a recipe) I made one up on the fly.

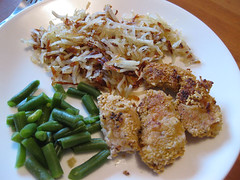
Here we go...I'm pretty sure this would work for anything you might want to eat a 'tender' of. Since chicken's a no-go for Ponyo, I used turkey. The quantities shown here fed me and the two boys, with 2 tenders left.

Turkey Tenders
2 turkey tenderloins, cut into wide strips
2 cups Chex cereal of choice, crushed (you might want to add just a tad of safe flour for better sticking, unless your crumbs are really tiny)
2 tsp California Garlic Pepper Blend (or other combination of spices to taste)
EnerG egg replacer to equal 2 eggs
1/2 cup safe flour (I used masa)

Put out three bowls: one for flour, one for egg sub, one for Chex cereal. Coat turkey tenders lightly with flour. Dip into egg sub and then into Chex crumbs, making sure the tenders are well coated. Handle tenders carefully so coating doesn't fall off.

Cook in a skillet over medium heat until golden brown and turkey is cooked through. Serve with your choice of dips, over pasta, whatever strikes your fancy!


Now, neither boy was a big fan of this until I gave them some dip. Then Wee Laddie ate three tenders (that's pretty good for him) and the Sprog at at least three. Nobody but me ate the green beans, but I keep trying. ;)